
To install floating shelves, start by gathering your tools like a drill, level, stud finder, and measuring tape. Measure and mark where you want the shelves, using a pencil for accuracy and a level to keep everything straight. Locate wall studs for secure mounting, drill pilot holes, and insert wall anchors if needed. Attach mounting brackets, then place your shelves onto them, making sure they’re level and secure. If you want to learn more, just keep going.
Key Takeaways
- Use a stud finder to locate wall studs for secure mounting of heavy floating shelves.
- Mark desired shelf height and length with a pencil, then verify with a level for accuracy.
- Drill pilot holes into studs or wall anchors to prevent drywall damage and ensure stable support.
- Attach mounting brackets or hardware securely to the wall, maintaining levelness throughout.
- Mount the shelf onto brackets or hardware, then check for stability and make adjustments as needed.
Installing floating shelves is a straightforward way to add stylish storage and display space to any room. Whether you’re sprucing up your living room, bedroom, or kitchen, these shelves can instantly elevate your decor. Before you start, gather your DIY tools, which typically include a drill, level, stud finder, screwdriver, measuring tape, and a pencil. Having the right tools on hand makes the installation smoother and guarantees your shelves are secure and level.
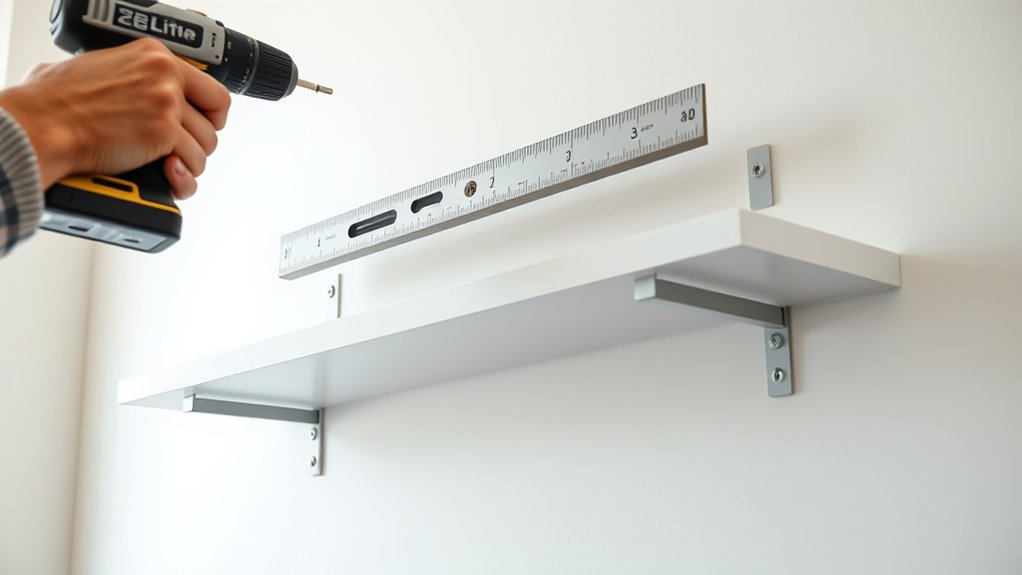
When it comes to design options, floating shelves come in various styles, sizes, and finishes, giving you plenty of choices to match your interior aesthetic. You might opt for sleek, minimalist shelves for a modern look or rustic wooden ones for a cozy vibe. Measure carefully to determine the placement, considering both your space and what you plan to display. Mark the desired height and length with a pencil, making sure to keep everything straight with your level. If you’re installing multiple shelves, use a ruler or template to keep their spacing consistent.
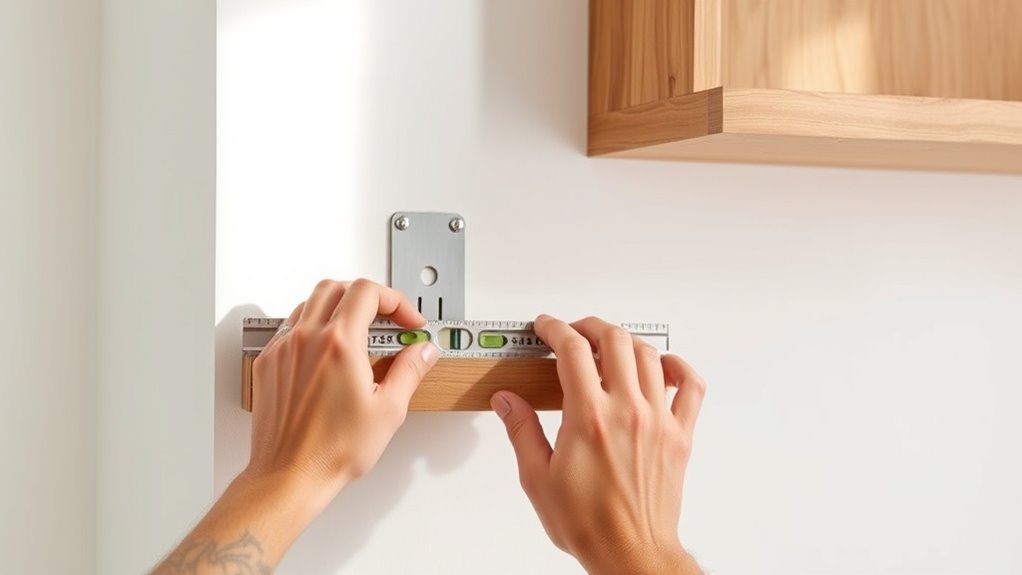
Next, locate the wall studs using your stud finder. Securing the shelves into studs guarantees they’ll hold heavier items without sagging or falling. Once you’ve marked the stud locations, drill pilot holes into the wall at your marked points. These holes will help guide your screws and prevent the drywall from cracking. Depending on your shelf design, you might need to insert wall anchors if you’re not attaching directly into studs, but for heavy loads, studs are best.
It’s also important to consider Kia Tuning options if you want to personalize your space further and add a unique touch. Align the mounting brackets or the back of the floating shelf with your pilot holes, then secure them with screws. Pay close attention to maintaining a level surface as you tighten the screws. Once the brackets or mounting hardware are in place, slide the shelf onto the brackets or attach it according to the manufacturer’s instructions. Usually, this involves a simple set of screws or clips that lock the shelf into position.
After everything is mounted securely, step back and check for levelness and stability. You might need to make minor adjustments by loosening and tightening screws. With your shelves installed, you can now get creative with your display options—arranging books, plants, artwork, or decorative objects. Floating shelves are versatile and stylish, offering both function and aesthetic appeal, all while allowing you to customize your space to reflect your personal style.

Starunder 6 Pack Floating Shelf Brackets, 6 Inch Heavy Duty Industrial Shelf Bracket, Black Metal L Brackets for Shelves Support DIY(1/5 Inch Thicked)
Real Hidden Brackests: These black shelf brackets have no lips and can be truly hidden. The base can…
As an affiliate, we earn on qualifying purchases.
As an affiliate, we earn on qualifying purchases.
Frequently Asked Questions
What Tools Are Essential for Installing Floating Shelves?
To install floating shelves, you’ll need a few essential tools. First, a drill with various drill bits helps create holes for anchors and screws. A stud finder is vital for locating wall studs, ensuring your shelves stay secure. You might also need a level to keep them straight and a pencil for marking spots. With these tools, you can confidently hang your shelves safely and precisely.
How Much Weight Can Floating Shelves Support?
Imagine a knight’s armor—your floating shelves need the right material strength. The weight capacity varies based on material and installation, typically supporting 15-50 pounds per shelf. Heavier materials like solid wood or metal offer greater support, while thinner, lighter materials might need reinforcement. Always check the manufacturer’s specifications and verify proper wall anchors to maximize weight capacity. Proper installation guarantees your shelves will hold your treasures securely.
Can Floating Shelves Be Installed on Textured Walls?
You can install floating shelves on textured walls, but wall texture types matter. For rough textures like popcorn or heavily textured surfaces, traditional anchors might struggle. Consider adhesive options such as heavy-duty mounting tape or specialized wall adhesives designed for textured surfaces. These provide a strong hold without damaging your wall. Always choose the right adhesive or anchors suited for your specific wall texture to make sure your shelves stay secure.
How Do I Hide the Mounting Hardware?
To hide the mounting hardware, you can use decorative covers or caps designed for floating shelves. First, check if your shelves come with these covers; if not, purchase them separately. Install the covers over the hardware to conceal screws and brackets, creating a seamless look. Alternatively, you can paint the hardware the same color as your wall or shelves for a more discreet finish, enhancing the overall appearance.
What Is the Best Way to Level Floating Shelves?
Imagine you’re a modern-day artisan, sculpting perfect balance. To level floating shelves, start by choosing the right shelf materials and wall anchors suited for your wall type. Use a level tool to mark the desired height, then install wall anchors securely. Carefully hang the shelves, adjusting as needed to make sure they’re perfectly level. This method keeps your shelves stable and visually appealing, much like a work of art.

Stud Finder Wall Scanner – 5 in 1 Stud Finder Tool w/Smart Chip and HD LCD Display, Stud Detector Beam Finders for the Center and Edge of Wood AC Wire Metal Studs Joist Pipe (Orange Juice)
Accurate and Rapid: The wall stud finder adopts an intelligent micro-sensor chip with the highest sensitivity which can…
As an affiliate, we earn on qualifying purchases.
As an affiliate, we earn on qualifying purchases.
Conclusion
Now that you’ve installed your floating shelves, imagine them as the silent guardians of your space, holding your favorite memories and treasures. Every nail and bracket is like a brushstroke in creating your personalized masterpiece. With each shelf in place, your room transforms into a gallery of your life’s story. So step back, admire your handiwork, and let these floating shelves be the wings that elevate your decor to new heights. Your space is truly yours now.

PULITUO'S 20V Cordless Drill/Driver, Electric Screwdriver – 2 Batteries, 30Nm, 21+1 Torque, 2 Speed, Keyless 3/8" Chase Drill with LED Light, Kit for Home (Green)
Powerful 20 V Motor and 2 x 1.5 Ah Battery: Equipped with a robust 20 V motor and…
As an affiliate, we earn on qualifying purchases.
As an affiliate, we earn on qualifying purchases.

KURUI 140Pcs #8 Self Drilling Drywall Anchors with Screws Kit, Heavy Duty Dry Wall Anchors for Hanging Sheetrock, 50 Self-Tapping Plastic Drywall Hangers 50 Sheet Rock Screws, Mounting Hardware -75LB
PREMIUM NYLON MATERIALS PLUS GLASS FIBER – Made of high-quality hard nylon plastic mixed with highly robust glass…
As an affiliate, we earn on qualifying purchases.
As an affiliate, we earn on qualifying purchases.