TL;DR
In tiny spaces like closets, controlling reflections and sealing gaps matter more than just adding foam. For more on this, see acoustic dampening and placement tips. Moving your rig into another room or ventilating it properly makes a huge difference in sound and heat management.
Imagine turning your cramped closet into a quiet, productive studio. It’s a surprisingly common idea—tiny, budget-friendly, and surprisingly effective.
The secret isn’t just foam or blankets; it’s where you put your gear, how you treat reflections, and how you keep heat out. In this guide, you’ll learn the real tricks to making a closet rig work for vocals, streaming, or AI workstations without turning your space into a noisy mess or a hotbox.
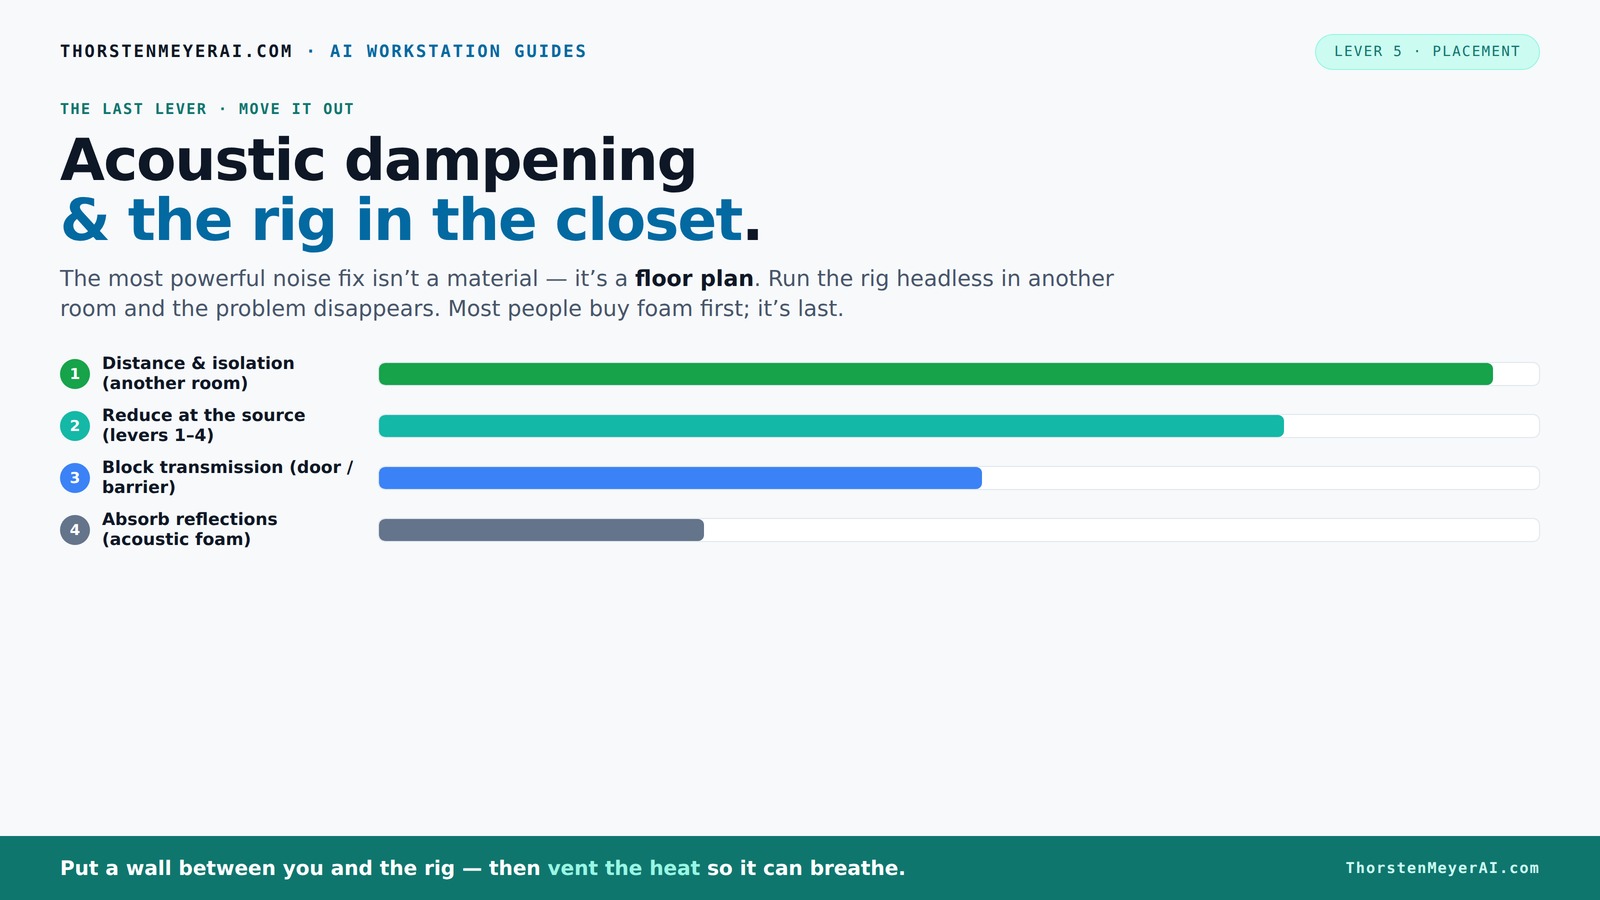
Acoustic dampening
& the rig in the closet.
The most powerful noise fix isn’t a material — it’s a floor plan. A rig you can’t hear because it’s in another room beats any amount of foam. Tap the approaches in Part 1 to see what actually works.
(another room)
(levers 1–4)
(door / barrier)
(acoustic foam)
Contain the noise, not the heat
Key Takeaways
- Moving your rig into another room is the most effective noise reduction tactic.
- Thick, bass-absorbing panels in corners handle low-frequency buildup in tiny rooms.
- Sealing gaps around doors and vents cuts down sound leaks significantly. For detailed strategies, see how to improve acoustic sealing.
- Ventilation is critical—hot, sealed closets can damage hardware and cause noise from fans.
- Placement of treatment matters just as much as the type of materials used.

Focusound 52 Pack Acoustic Foam Panels 1" x 12" x 12" Sound Proof Foam Panles Soundproofing Noise Cancelling Wedge Panels for Home Office Recoding Studio with 300PCS Double-Side Adhesive
Soundproofing - Acoustic foam panels triangular grooves structure for better noise absorption, helps to reduce and absorb unwanted...
As an affiliate, we earn on qualifying purchases.
As an affiliate, we earn on qualifying purchases.
Why Your Closet Can Be Both a Blessing and a Curse for Sound
Closets are small enough to tame echo and reflection, but they can also trap low frequencies and create a boxy sound. The size helps with soundproofing—less space for sound to bounce around—yet, it can make your recordings sound muffled if you’re not careful.
For example, if you record vocals in a tiny closet without treatment, you might end up with a thick, boomy tone, especially in the low end. But, add some absorption and seal gaps, and suddenly it's a cozy little vocal booth—perfect for podcasts or streaming.
Understanding how small rooms behave is key: reflection control and sealing gaps are your best friends, not just slapping foam everywhere. The tradeoff is that while small spaces reduce echo, they can also amplify low-frequency buildup, which can muddy your sound. Therefore, treatments need to be carefully chosen—thicker bass traps in corners can help manage this, but over-treating can make your sound too dead or unnatural. Striking a balance is essential for achieving clarity without muffling your voice.

VEVOR Portable Vocal Booth, 6.56 ft Height, Portable Recording Studio with Travel Bag, Mobile Tablet Stand, Thickened Soundproofing, Sound Isolation Booth for Echo-Free Vocals, Podcasts, Voiceovers
Say Goodbye to Echoes: Built with durable Oxford cloth and acoustic padding, this recording booth for the home...
As an affiliate, we earn on qualifying purchases.
As an affiliate, we earn on qualifying purchases.
Where to Focus Your Acoustic Treatment in a Closet
In tight spaces, placement matters just as much as the material. Start with the microphone position. Aiming away from reflective surfaces reduces early echoes. For example, place the mic about a foot away from the wall behind you, and angle it slightly to avoid direct reflections.
Next, treat the most problematic surfaces: the wall behind the mic, the side walls, and the ceiling above. Thicker panels (2-4 inches) soak up more bass, especially in corners where low frequencies tend to build up. Covering 70-80% of the wall surface with absorption helps tame that boxy sound.
Don’t forget the door. Sealing gaps with weatherstripping or acoustic sealant can cut down on leaks. Simple blankets or a heavy curtain over the door also help.
Focusing your treatment on these key areas ensures that reflections are minimized where they matter most, and low-end resonances are controlled, leading to clearer, more natural sound. The tradeoff here is that over-treating can make your room sound too dead, removing the liveliness needed for engaging vocals. Proper placement and a balanced amount of absorption are crucial for maintaining a natural tone.

18 Pack Soundproof Wall Panels Self-Adhesive, Square Sound Proof Foam Panels for Wall, High Density Acoustic Panels, Acoustic Foam Panels for Home Office, Recording Studio 12" X 12" X 0.4" Black
Sound-Absorbing Principle: High-quality polyester fiber material and porous structure capture and absorb air vibrations in sound waves;reduce sound...
As an affiliate, we earn on qualifying purchases.
As an affiliate, we earn on qualifying purchases.
The Best DIY Tricks for a Cheap, Effective Closet Vocal Booth
If you’re on a budget, don’t worry. You can turn a closet into a pretty decent vocal booth with some simple, inexpensive materials. Use dense foam panels (2-inch thick) on the walls where reflections bounce most, especially behind the mic and on the ceiling.
Wrap blankets or quilts around the door frame and any gaps. Place a rug or soft mat on the floor to absorb reflections from below. For corners, use thick bass traps or even rolled-up towels to stop low-frequency buildup.
For example, a streamer I know used leftover foam, blankets, and a simple DIY vent fan to keep heat down. It cost less than $200 and sounds way better than a bare closet. The key is understanding that coverage and placement matter more than expensive materials—strategic positioning of absorbers and sealants creates a significant improvement in sound quality without breaking the bank.

Audimute Soundproofing Acoustic Door Seal Kit - Door Sweep and Seal - (Standard Size)
Includes a Door Seal (3/16" x 1/2" x 25') and a Door Sweep (1/2" x 1.5" x 4').
As an affiliate, we earn on qualifying purchases.
As an affiliate, we earn on qualifying purchases.
How to Manage Heat When Your Rig Lives in a Closet or Cabinet
Putting a powerful computer in a closet is a hot idea—literally. To learn about managing heat and cooling solutions, check out liquid vs. air cooling systems. A sealed space traps heat, which can throttle your machine’s performance and damage components. The key is ventilation: a quiet exhaust fan, passive vents, or even a small duct system can help move heat out.
For example, installing a low-noise fan that pulls hot air out and draws cooler air in keeps temps stable. Using a [liquid cooling system](https://thorstenmeyerai.com/liquid-vs-air-cooling-inference-rig/) with exhaust ducts can prevent overheating in small enclosed spaces.
Remember: good airflow isn’t just about keeping cool; it also reduces noise from fans. Proper ventilation turns your closet rig into a safe, quiet, and efficient workspace. Without adequate cooling, your hardware may throttle performance or overheat, leading to potential hardware failure or thermal shutdowns. The tradeoff is balancing noise levels with effective cooling—using quiet fans and strategic ducting minimizes noise while maintaining safe temperatures.
Why Moving Your Rig Elsewhere Is the Easiest Noise Fix
The simplest way to quiet your setup? Put it in another room. Learn more about creating a quiet workspace at Whiff Whisper. A closet or basement far from your workspace can cut noise dramatically. Think of it like a 'rig in the closet'—your computer roars away while you sit in silence, connected via fast network or remote desktop.
This setup works perfectly for AI inference work, streaming, or voiceovers. You hit your API, and your rig runs in the background while you focus on content creation.
All you need is a wired connection or strong Wi-Fi, plus decent ventilation. It’s a game-changer for noise-sensitive environments. The implication is that you can preserve your room’s acoustic quality for recording purposes while still maintaining high-performance computing in a separate space, avoiding the compromises of small-room acoustics and heat buildup.
The "Rig in the Closet" Setup — One Big Caveat You Must Know
Sealing a closet or cabinet traps heat—fast. For tips on heat management and cooling, see heat and noise control in small spaces. A 600W GPU running 24/7 in a sealed space can cause the temperature to climb over 85°F (29°C) in just a few hours. That’s bad for hardware and performance.
The solution? Ventilation. Install an exhaust fan, use ducting, or invest in a purpose-built soundproof cabinet that combines absorption with active cooling. For more on this, visit soundproofing and cooling solutions. These cabinets balance noise reduction with heat dissipation, keeping your rig healthy and quiet.
For example, a user built a custom cabinet with ducted airflow and a thermostat-controlled fan. It kept noise below 40 dB and temps under 75°F (24°C) even during heavy loads. Ignoring heat buildup can lead to thermal throttling, decreased lifespan, or outright hardware failure. Proper ventilation is essential to sustain performance and longevity.
Quick Comparison: Foam, Blankets, and Sealing — What Works Best?
| Feature | Foam Panels | Blankets & Quilts | Sealing & Barriers |
|---|---|---|---|
| Best for | Absorbing high and mid frequencies | Reducing sound leaks & reflections | Stopping sound from escaping or entering |
| Cost | Moderate | Cheap or free if repurposed | Inexpensive to DIY |
| Ease of install | Easy, mount on walls | Simple, hang or drape | Requires sealing gaps |
| Limitations | Less effective at low frequencies | Doesn't block sound transmission | Gaps and leaks still let sound through |
Avoid These Common Mistakes in Your Tiny Studio
Don’t assume foam alone will make your closet silent. It only reduces reflections inside the space; it doesn’t block sound from escaping. Always seal gaps around doors and vents.
Don’t forget the low-frequency problem: tiny rooms often have bass buildup, making your vocals sound boomy. Use bass traps or thicker panels in corners.
And finally, don’t ignore heat. A rig in a sealed closet will overheat fast without proper airflow. Ventilate, ventilate, ventilate. Overlooking heat management can lead to hardware failure or reduced performance, which defeats the purpose of your setup.
Is a Closet Big Enough for Quality Vocals and Streaming?
Yes, if you treat it right. Small rooms work best when you focus on reflection control, sealing gaps, and ventilation. Many creators use closet booths for podcasts, singing, and streaming with great results.
Imagine recording vocals in a closet with thick bass traps in the corners, a blanket over the door, and proper mic placement. The result? Clear, warm recordings free of echo and room noise.
It’s all about understanding the room’s acoustics and addressing them smartly, not just throwing in foam panels. The key is to recognize the limitations of small spaces and compensate with strategic treatment and placement, which makes high-quality results achievable even in the tiniest rooms.
Frequently Asked Questions
What is the difference between acoustic treatment and soundproofing?
Acoustic treatment reduces reflections and echoes inside a space, making the sound clearer. Soundproofing, on the other hand, stops sound from leaving or entering the room—like a barrier. In small closets, treatment mainly helps with sound quality, while sealing gaps prevents noise leaks.
Where should I place foam or panels in my closet vocal booth?
Place panels behind the mic, on the ceiling above, and along the side walls facing the microphone. Focus on the reflection points where sound bounces directly into the mic. Corner bass traps are also key for controlling low-end buildup in tiny rooms.
Should I face the mic toward the wall or away from it?
Facing the mic away from reflective surfaces reduces early reflections and helps produce a clearer recording. Angling the mic slightly away from the wall behind you minimizes echo and keeps your vocals warm and natural.
How do I stop sound from leaking through the door?
Seal cracks with weatherstripping or acoustic sealant, hang a thick blanket over the door, or install a door seal kit. These quick fixes can dramatically cut down on noise escaping the closet and leaking into other rooms.
Do I need to treat the ceiling as well as the walls?
Yes, especially if you notice reflections or echo from above. Placing treatment panels or diffusers on the ceiling helps absorb sound bouncing down from above and creates a more controlled environment.
Conclusion
Think of a closet not as a limitation, but as a blank canvas for sound. With smart placement, sealing, and ventilation, you can turn even the tiniest space into a quiet, effective studio or AI rig room.
Remember: the best soundproofing isn’t just about absorbing noise — it’s about keeping heat out, sealing gaps, and placing your gear where it matters most. Your perfect closet studio might be just a few simple tweaks away from transforming your workflow.